|
|
|
|
 |
|
 |
BMW Garage | BMW Meets | Register | Today's Posts | Search |
 |

|
BMW 3-Series (E90 E92) Forum
>
Hartge replica lip installation
|
 |
| 08-27-2006, 08:10 PM | #1 |
|
Deny everything

217
Rep 11,378
Posts
Drives: 2006 330i; 2015 X6, S1000RR
Join Date: Apr 2006
Location: Beautiful MD
|
Hartge replica lip installation
Well, the lip does not fit 100%
As a result, you need to trim here and there. It all depends on how it fits on your car. 1) Remove the accent bars for instructions on that, look here: http://e90post.com/forums/showthread.php?t=28099 2) attach lip to see where you need to trim. I used painter's tape (blue tape) to mark where to trim. This picture shows how much I had to trim on one pillar. 3) also mark where you need to drill holes for the underside of the car. There are 3 screws to hold it in place from the bottom. I did not know what to use to trim, but Thanks to lux.sh I got myself a dremel tool. Very handy. 4) remove the lip and go ahead with the trimming and drilling. 5) Apply the double side tape to hold the top of the lip to the car. 6) install the lip 7) re-install the accent bars. Note: you might need to trim them down. I did not trim them. they fit very tight but that helped secure the lip pillars. Here is the final product. Good luck.
__________________
I need a drink   Last edited by FrankoQ; 09-15-2006 at 09:13 PM.. |
| 08-27-2006, 10:34 PM | #3 |
|
¡Viva España!
373
Rep 7,803
Posts |
Nice job, looks great

__________________
23 G42 230i Mineral White Cognac, Aluminum With Mesh Effect Interior Trim MODS Clear Guard, 15% Ceramic Tint, Floating Caps
|
|
Appreciate
0
|
| 08-28-2006, 09:38 AM | #6 |
|
Moderator
318
Rep 17,767
Posts
Drives: F36 428i,E90 328i, E85 Z4 3.0i
Join Date: Jan 2006
Location: DC Metro
|
Finally able to see pics...
Frank, car and new lip looks awesome!! I always thought these lips were plug and play, didn't know a lot of trimming/sanding work was required. I'll be sure to give you a call if I ever order one  That's some fine DIY'ing, there pardner.... That's some fine DIY'ing, there pardner....
__________________
|
|
Appreciate
0
|
| 08-28-2006, 11:16 AM | #7 | |
|
Deny everything
217
Rep 11,378
Posts
Drives: 2006 330i; 2015 X6, S1000RR
Join Date: Apr 2006
Location: Beautiful MD
|
Quote:
That's kind of why I posted this DIY. Now others can see the kind of work involved.
__________________
I need a drink |
|
|
Appreciate
0
|
| 08-29-2006, 11:24 AM | #9 |
|
Lieutenant
 40
Rep 589
Posts |
thanks for the DIY. looks good
|
|
Appreciate
0
|
| 08-29-2006, 01:39 PM | #10 | |
|
Deny everything
217
Rep 11,378
Posts
Drives: 2006 330i; 2015 X6, S1000RR
Join Date: Apr 2006
Location: Beautiful MD
|
Quote:
My wallet needs to heal for a while.
__________________
I need a drink |
|
|
Appreciate
0
|
| 08-29-2006, 01:40 PM | #11 | |
|
Moderator
318
Rep 17,767
Posts
Drives: F36 428i,E90 328i, E85 Z4 3.0i
Join Date: Jan 2006
Location: DC Metro
|
Quote:
__________________
|
|
|
Appreciate
0
|
| 08-29-2006, 01:52 PM | #12 | |
|
Deny everything
217
Rep 11,378
Posts
Drives: 2006 330i; 2015 X6, S1000RR
Join Date: Apr 2006
Location: Beautiful MD
|
Quote:
I might have to ban myself from this site.
__________________
I need a drink |
|
|
Appreciate
0
|
| 08-29-2006, 01:54 PM | #13 |
|
Moderator
318
Rep 17,767
Posts
Drives: F36 428i,E90 328i, E85 Z4 3.0i
Join Date: Jan 2006
Location: DC Metro
|
You know what your ride needs....blacklines
... and 12mm rear spacers....
__________________
|
|
Appreciate
0
|
| 08-29-2006, 01:56 PM | #14 | |
|
Deny everything
217
Rep 11,378
Posts
Drives: 2006 330i; 2015 X6, S1000RR
Join Date: Apr 2006
Location: Beautiful MD
|
Quote:
where did you get your spacers?
__________________
I need a drink |
|
|
Appreciate
0
|
| 08-29-2006, 01:58 PM | #15 |
|
Moderator
318
Rep 17,767
Posts
Drives: F36 428i,E90 328i, E85 Z4 3.0i
Join Date: Jan 2006
Location: DC Metro
|
why stop now, you just a little bit short of utter perfection Rogue Engineering's the way to go for spacers, awesome quality and customer service and they all come with the required lug bolts. http://www.rogueengineering.com/Merc...tegory_Code=WH $110 for the pair plus s/h
__________________
|
|
Appreciate
0
|
| 08-29-2006, 06:08 PM | #16 |
|
missing two turbos.
577
Rep 4,859
Posts
Drives: fast around corners.
Join Date: Sep 2005
Location: Curves
|
you guys are all evil.
__________________
06 AW E90 330i ZPP/ZSP/Step/Expired Warranty 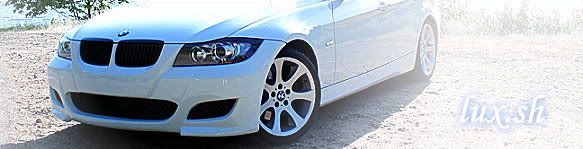 : Prior Design Front : ACS Rear : ACS Roof : BlackLines : Simota Intake : Carbon Fiber Interior Trim : : MTEC V3 : 24% Charcoal : V1 Hardwired : Solaris Invisibulbs/LED interior : |
|
Appreciate
0
|
| 10-24-2006, 12:08 PM | #17 |
|
Lieutenant
72
Rep 402
Posts
Drives: 2023 G01 LCI X3 M40i
Join Date: Jun 2006
Location: Lawrenceville, NJ
|
I have a question, I just received my Hartge lip from DTM and there are no holes drilled in the bottom of it to screw it into the bumper? Am I missing something?
__________________
2023 G01 LCI X3 M40i
My Garage | Phytonic Blue | Black Sensatec | Carbon Fiber Trim | Parking | Premium | Remote | Wireless | Harmon Kardon | 19" 887M Bi-color Midnight Grey |
|
Appreciate
0
|
| 10-24-2006, 04:03 PM | #18 | |
|
Deny everything
217
Rep 11,378
Posts
Drives: 2006 330i; 2015 X6, S1000RR
Join Date: Apr 2006
Location: Beautiful MD
|
Quote:
I had to drill the holes myself. what I did was: fit the lip on the car and then go underneath to measure where to make the holes. I was able to make the holes right under the bolts that were going to hold the lip in place. Frank
__________________
I need a drink |
|
|
Appreciate
0
|
| 10-25-2006, 02:01 PM | #19 |
|
Lieutenant
72
Rep 402
Posts
Drives: 2023 G01 LCI X3 M40i
Join Date: Jun 2006
Location: Lawrenceville, NJ
|
I've test fitted my lip to my car. A note to others, you may want to cover the portion of your stock bumper with thick scotch packaging tape if you want to avoid scuffing it up during the test fitting. to get the lip on you need to start at one wheel well, and then move across the bumper sliding it over the closest pillar, then the next pillar, then pull in into the other wheel well.
I trimmed a little off of the lip on the two pillars to make it fit better, but still find the top of the lip on the pillars to be a concern. It just seems to me that they won't be totally flush when it's taped on and will stand out. Does anyone have any close up pictures of the areas I've circled in red in the picture below on their car so I can see how their install looks? I also showed a closeup, but remember, it's not taped yet, if I push it hard against the bumper it is slightly better. Also, take a look at the picture of the OEM hartge lip, and you'll notice those areas have a totally smooth transition. Has anyone been able to duplicate this when installing the replica lip? Do you think they had those area's filled with bondo/filler and then repainted the whole bumper to get that smooth transition look?  Closeup on the top edge of the left pillar  
__________________
2023 G01 LCI X3 M40i
My Garage | Phytonic Blue | Black Sensatec | Carbon Fiber Trim | Parking | Premium | Remote | Wireless | Harmon Kardon | 19" 887M Bi-color Midnight Grey |
|
Appreciate
0
|
| 11-12-2006, 12:41 PM | #21 |
|
Lieutenant
72
Rep 402
Posts
Drives: 2023 G01 LCI X3 M40i
Join Date: Jun 2006
Location: Lawrenceville, NJ
|
While I think I may be the only one who cares about it, it was really buggin me, so here is DIY on how I dealt with the gaps on the pillars (note: I jump back and forth between the left and right pillars in the pictures as I picked the photos that were least blurry):
Here is the before pic of the wide gap at the top of the pillar that I didn't like. IMO when you were standing in front of the car, looking down at the front bumper, these gaps gave the lip a bit of a cheap, aftermarket, "slapped on" look: I went to Pep Boys and bought some bumper repair epoxy from Bondo for about $5.00. Like all epoxy products, it comes with two tubes that you have to mix together, and then it starts to cure and harden. I thought this would be a good product as it was both flexible when it was dry, and could be painted. It is also black, and I have a dark monaco blue car, so I thought that would help. I tested several solvents to see what would work to clean the epoxy off the lip/bumper, and found that Acetone worked well:  To apply the bumper epoxy, I used toothpicks and some popsicle sticks trimmed to a point:  To avoid making a mess all over the bumper/lip I used painters tape.  As you apply the bumper epoxy, be liberal with it. While it is still liquid, it will seep down into the gap, so keep applying it until it no longer seeps down, then you can use the sticks to smooth it out and remove as much excess as possible. You have to work quickly, as it gets pretty stiff in about 5 minutes. As it starts to stiffen, about 2-3 minutes from the time you apply it, you'll want to remove the painters tape. I was afraid if it was left on after the epoxy had totally set up, it would pull the epoxy out once it was removed. Prior to removing the painters tape, lightly soak an area of a cloth towel (not a paper towel or cotton ball as they will leave paper/cotton residue stuck to the curing epoxy) with acetone and smooth out the epoxy removing additional excess epoxy. Remove the tape and continue to clean up the area with the acetone soaked cloth. Be careful not to overdo it with the acetone as it can cloud your clearcoat and require you to go back later and buff the clearcoat. Here is how it came out:  My original plan was to paint the bumper epoxy with several layers of touch-up paint and a couple layers of clear coat. But at this point, it looks so good, that I think I have a better chance of making it look worse with touch-up than better. Having a very dark car, and the fact that the bumper epoxy is black, makes me think I should just leave it as it is. If you have either a black or monaco blue car, and have installed the Hartge lip and have the gap issue I had, this is a great way to improve the look. I'm very pleased with how it came out.
__________________
2023 G01 LCI X3 M40i
My Garage | Phytonic Blue | Black Sensatec | Carbon Fiber Trim | Parking | Premium | Remote | Wireless | Harmon Kardon | 19" 887M Bi-color Midnight Grey Last edited by Boondoggler; 11-12-2006 at 04:12 PM.. |
|
Appreciate
0
|
| 11-12-2006, 05:35 PM | #22 |
|
Deny everything
217
Rep 11,378
Posts
Drives: 2006 330i; 2015 X6, S1000RR
Join Date: Apr 2006
Location: Beautiful MD
|
Outstanding job.
I was thinking of removing my lip to add more double side tape to try to close that gap. Now, thanks to you, I know what I need to do.
__________________
I need a drink |
|
Appreciate
0
|
 |
| Bookmarks |
|
|